使用Git上传项目到github仓库
Git 是一个免费的开源 分布式版本控制系统,旨在快速高效地处理从小型到大型的所有项目。
Git
创建本地文件夹
在 此文件下 打开 bash
右键 -> 更多
两种打开界面,看你喜欢那一款。
先打开 windows 终端 ,再 在更多下选择Git Bash ,cd 到指定目录
直接 open git bash here
基础配置
1 | // git 设置用户名与邮箱: |
配置ssh服务,关联github
还在 git bash 执行 。
bash 比之 powershell 有着linux命令操作
1 | // 1.检查本地主机是否已经存在ssh key |
登录github->点击头像->settings->SSH and GPG keys->Add/New SSH key
粘贴保存
检验连接,执行
1 | ssh -T git@github.com |
其他配置
设置 Git 的全局 HTTP 代理 以7890端口举例
1 | git config --global http.proxy http://127.0.0.1:7890 |
在 HTTPS 端口使用 SSH
创建个config文件 在./ssh下 (win+r 输入 %HOMEPATH%快速访问)
Git 命令
1 | git init //初始化 生成了个 .git 隐藏文件夹 |
后面再用 , 执行
eg: 修改了 1.md 文件
1 |
|
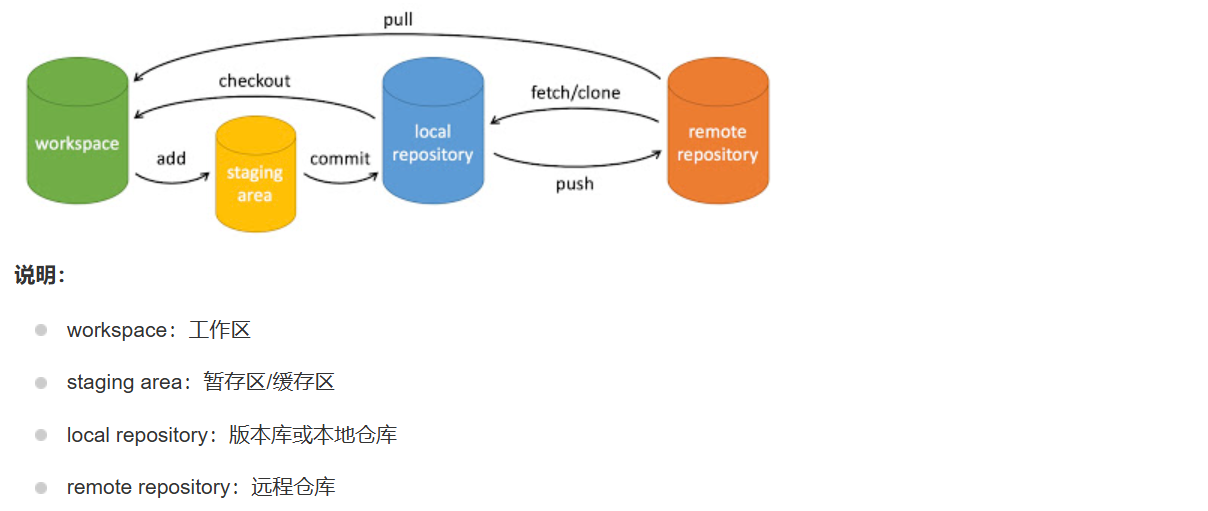
其他
初始化仓库:
1
git init
克隆远程仓库:
1
git clone [url]
查看当前状态:
1
git status
添加文件到暂存区:
1
git add [file]
提交更改到本地仓库:
1
git commit -m "commit message"
查看提交历史:
1
git log
查看更改的文件:
1
git diff
查看历史记录的图形化界面:
1
gitk
查看当前分支:
1
git branch
创建新分支:
1
git branch [branch-name]
切换到指定分支:
1
git checkout [branch-name]
创建并切换到新分支:
1
git checkout -b [branch-name]
合并分支:
1
git merge [branch-name]
推送本地更改到远程仓库:
1
git push origin [branch-name]
拉取远程更改:
1
git pull origin [branch-name]
设置远程仓库:
1
git remote add origin [url]
查看远程仓库:
1
git remote -v
删除远程分支:
1
git push origin --delete [branch-name]
删除本地分支:
1
git branch -d [branch-name]
重命名分支:
1
git branch -m [old-branch-name] [new-branch-name]
查看所有分支的合并情况:
1
git branch -a
拉取远程分支并创建本地分支:
1
git fetch origin [branch-name]:[local-branch-name]
解决合并冲突:
- 手动编辑冲突的文件。
- 使用
git add将解决后的文件添加到暂存区。 - 使用
git commit提交解决冲突后的更改。
撤销工作目录中的未暂存更改:
1
git checkout -- [file]
查看已跟踪文件的更改:
1
git diff [file]
重置暂存区,取消暂存文件:
1
git reset HEAD [file]
查看配置信息:
1
git config --list
设置全局配置:
1
2
git config --global user.name "[name]"
git config --global user.email "[email address]"设置跟踪文件的换行符:
1
git config --global core.autocrlf input
查看帮助文档:
1
git help [command]